Wednesday, February 28, 2018

Roll Out the Barrel


This rather interesting miniature is the February Raffle figure for the Patreon page.  Anyone who pledges support to the page is eligible for the 4th monthly raffle.  Here's a link to the page:


There's much more to the page than raffle figures of course.  I do at least 1 2.5 hour facebook live tutorial each week, and starting in March, more YouTube painting lessons will be available to those subscribing $5 or more.  Those pledging $10 will be able to see other special sessions, and more of the Painting Pyramid series as well.

Here's an example of the Dark Sword figure demos, and the kinds of miniatures that will be offered on these 'secondary' raffles:


I will also be doing special Bolt Action battle reports that are only available to the patrons.  Two have been posted thus far to my YouTube channel.


In addition, I have been making some of the Painting Pyramid series available to the Patrons.  I will be sending private links to the Patrons on March 1st, which will be one of the 12 basing videos that I created as part of the series.  There were 53 videos in all covering a variety of subjects, so just about every interest or question should be covered!

I am also making new Painting Pyramid videos covering techniques that I have learned since that first batch was made.  Oil painting, new basing and terrain techniques are all planned!

To all who have already supported the page, you have my thanks, and the drawing of this Raffle figure will take place in a few days during the next live session, so stay tuned!


Tuesday, February 27, 2018

Drone Wars


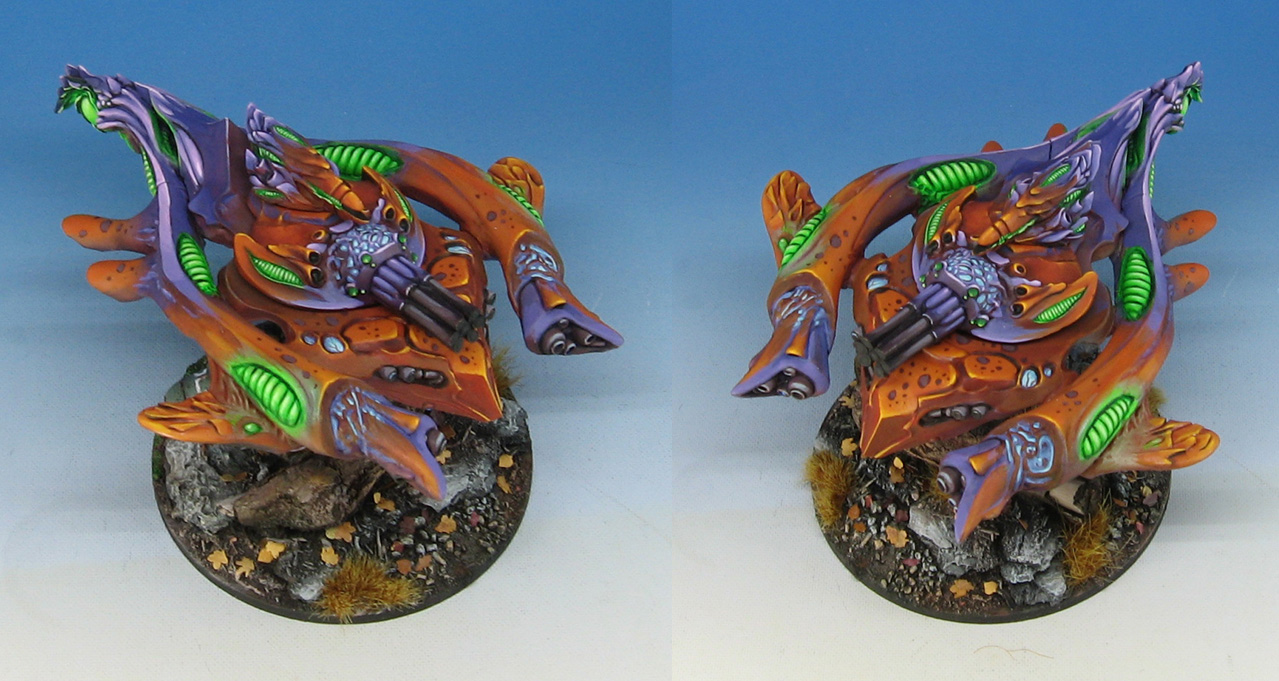
Here's something brand new in the Gates of Antares universe... large combat skimmers for the Isorian faction!  These very interesting looking vehicles are new releases from Warlord Games.  This is the Mahran Vesh MV5 Combat Drone.

It is now in the webstore:


 I have painted a fairly large Isorian force already, including a few step by step tutorial articles.  


Here's the first stage of the painting process:


Now for stage two:


These views from above give you a better sense of how that color placement would work out on a much larger an complex piece.  That is always a major challenge in every army... finding a color scheme that is unique, but also work on infantry and vehicles alike!

On both of these larger Isorian skimmers, it was necessary to alter the purples and oranges across the broader areas.  For instance, the purple can be tinted more blueish on some sections and more reddish in others.

I will be posting another blog post on the transport version of these skimmers, with more information on how to approach a "sci-fi"  army... utilizing much brighter and saturated colors than you might normally consider.


As with the rest of the army, Vallejo Fluorescent green was used for all the glowing areas.  While it is not glow in the dark paint, it has a great deal of transparency thus allowing light to pass through the color and back out again with great efficiency.

You have to mix these colors with 'regular' paints for the most part, they are that transparent!  I have dozens of articles on the blog, and many Facebook live videos that show how such things can be used.  Here's a link to one of them:


Monday, February 26, 2018

Red Storm Coming!


While I have been working on a number of the vehicles for the Winter Soviets, this is the first color test figure that I created for the infantry.  I have already done an article on the basing of the foot troops, which I will include here.


I thought that doing some winter urban basing would not only be interesting, but work for a number of special battle reports.  You can see some thoughts on that urban basing here:


I will try to do a few Facebook live sessions on the painting process, and even make a few more step by steps on the basing.  The first test of the urban winter bases were for the Americans.  There's a new winter American army under way, so plenty of opportunity to create more!


It was especially fun to see him with one of the completed T-35/85's.  Here's a link to the live session where that was painted:


I am now working on more "permanent" videos for painting these historical armies, which would be edited and rendered to USB drives like my original Painting Pyramid video series.  These will be made available to my Patreon subscribers initially.  The more successful that is, the more I can make!  It is a lot of fun to do these, but a tremendous amount of work, especially in editing and rendering.

Any support is appreciated!


Saturday, February 24, 2018

Galaxy Quest


I really enjoyed the live session where experimentation with the Vallejo Metal Medium was tested on this Gates of Antares figure.  I had only had a chance to use it on a few occasions, so it was quite interesting to use that in front of an audience!

Here's a link:


You have to think differently when you are using the medium, since the more of it is in your mixtures, the lighter your paint will be.  Here's the first step by step example of using the medium to affect "regular" paint:


The Reaper Clear and Liner paints mix with this medium very well, since they are very pure and intense pigments.  They also went well with the Secret Weapon colors, as those are designed to be used transparently.


I am hoping to make a more "permanent" tutorial video on various methods for using this medium.  That will eventually be available to the Patreon subscribers at the $5 level.  The more folks who subscribe to the page, the more videos I can make!


Friday, February 23, 2018

Adepticon Approaches!


Meet Ursula Chenkova, the new Limited Edition figure for Adepticon 2018!  This is from Victoria Miniatures, as you can tell by its distinct style.


Here's a link to the live session where she was painted:


I decided to paint that in a classic red and white scheme, since it seems like a lot of folks have problems with both of those colors.  Their reds turn pink or chalky, and their whites either look too washed out or too dark.

Since I wanted to show everyone what the Shaded Basecoat and Glazing techniques are like, I started this one off with a basic layer or green Stynlrez primer.

See you at Adeption!  Fort Wappel shall rise!!


Wednesday, February 21, 2018

Well Armed


The classic Confrontation figures continue with this  "Ogre" sized version.  This was a fairly large infantry style figure for that time period, and like many other miniatures from that line, the approach to posing and sculpting was quite different.


In 2002/2003, larger figures tended to be bulkier, mostly hunched over or with a stance that was more spread out.  I remember when I first saw these, and how the use of the Fimo material for sculpting had changed how you could approach a larger figure.

It was fun to get the chance to paint one of these at last!


Monday, February 19, 2018

Thief of Hearts


I have said many times how much I love Dark Sword miniatures.  The level of detail and precision makes it a dream to paint.  By comparison, the figures almost "paint themselves", which make them ideal subjects for the live streams, such as this facebook live episode.


I used some Green Stuff World flower tufts on the base, which was a very nice compliment to all the purple tones on the figure itself.  I have many more of these Dark Sword figures prepped, hoping to show dozens of different techniques in both oil paints and 'regular' acrylic paints.


I will be doing special YouTube versions of the live painting sessions on many more Dark Sword figures.  These will be available for the Patreon supporters who pledge $5, and those pledging $10 can win these figures in secondary raffles, in addition to the usual monthly raffle.

I am hoping that the page does well enough that I can start to get more interesting large figures to paint in oils.  

As always, any support for the page helps a great deal!


Sunday, February 18, 2018

Swamp Things


When we first started painting figures back in 2001, we were working on a lot of  Celtos, Void and Chronopia miniatures.  I especially liked the Celtos minis, and a number of the Chronopia figures had a similar set of sculpts.

They were all sculpted by Kev White I believe, which meant that there would be certain factors that made them fun to paint!


They tended to be more of a "blank canvas", and not buried in straps and belt buckles!  This meant that you could take the figure in more directions, and make your own choice.

With the advent of ZBrush, you could practically create a sculpt entirely out of belt buckles, because there's a 'brush' in that program which you can use to paint those buckles all over the mini. 

Having those open surfaces to work with meant that you could put more of your own flavor on the figure.


Here's an example of a typical Celtos mini... and there are many more in the gallery!


Friday, February 16, 2018

At last!


I remember seeing this figure posted to various painting sites way back in 2003... part of the Rackham craze that had a major effect on sculpting and painting.

While today's big change in sculpting is ZBrush, at this time using additional materials that were not green stuff for sculpting was not very common.  I believe that Fimo was also used, which probably led to lots of exploding originals during vulcanization.

Having done a lot of stuff with sculpey, I know that you can get really fine details with it... and it can even be carved and sanded after the fact.

I believe that I used some Fimo as I was sculpting this giant Mastadon:


It was very fun to get a chance to work on this figure myself, as I can still remember some of those pictures that I saw posted in the days of painting forums.  Almost past living memory! :-)


Thursday, February 15, 2018

A New Standard


Everybody loves banners for their units, but sometimes you have to convert them from existing infantry figures.  In this case, I needed the "on foot" version of my Easterling Kataphract standard bearer... since you can be knocked off your horse in LOTR.


The process was very simple, taking a piece of heavy paper, soaking it in a glue/water mix, then shaping it, and gluing it to a plastic rod.

I never really liked the solid metal banner figures, and this was a great opportunity to make something unique and useful!


Wednesday, February 14, 2018

Diving in!


I have been eagerly awaiting a chance to paint one of my aircraft for Bolt Action for many months.  Very slowly, I have been collecting 1/48 scale kits for all nations, eras and theatres.  

The Junkers JU 87, or Stuka, was particularly important in the early war phase which I am representing in my battle reports, so it had to be the very first one!

While I also have a 1/48 scale version of this, I thought that I would try the Blitzkrieg Miniatures kit.  It was an extra challenge to paint, since it is resin (aka heavy!) and the decals were missing.

This meant that I had to do them by hand.  Freehand is something I am very used to, but not this kind of geometric shape on such a large and unusually shaped surface.  Also, these had to be 'repeated' on both sides of the aircraft!

I found some references of markings from France 1940, grabbed a pencil, and got down to work!


I drew out a few 'guides' in the form of dots, followed by lines, just to indicate where each marking should begin and end, so that size would be matched up on each side.

I used a grayish/white mix and started by painting the inner white sections of the Balkenruz.  It will be easier to paint the black sections around this, thus 'cleaning up' and variations in the white lines. 


You can see that in this image, with the black filler acting like a ruler, straightening out the white areas.


This was repeated for all the markings.  If necessary, I went back in with the white to clean up the black areas, and even a touch of the dark green fuselage and wing color in case I needed to clean up an outer edge.


I still have to weather this some more, but that will probably wait until after I have filmed the next Battle Report in my Bolt Action series!!

I will be using some silver paint and sponges to 'remove' some of the dark green paint around key areas, like access panels, where the pilots and crew would be stepping on the wings, and so on.  Since that won't show up very much in the few moments that this will be on screen, I thought I could make that another how to article.


It certainly looks the part on my Ardennes board. I have not used an airstrike in any of my Bolt Action games yet, and it will be an important part of the next episode of the Battle Report series called "Sickle Stroke".


As I have researched the Battle of France, I continuously read about the methods used for dealing with the heaver French tanks such as the Char Bis.  While their standard Anti Tank weapons were ineffective "Door Knockers", the Junkers JU 87's were quite deadly attacking from above.

I want to represent this with the forces that have been chosen, as well as the scenario itself.


Just like the first report, I am trying to blend a historical set up with a bit of "What if".  There were many counterattacks planned by the Allies for the Battle of France, but between poor communication, coordination and even dead commanders, these hasty offensives ended up with poor support.

In this case, I wanted to see if a mixture of heavy French units could outflank a rapidly advancing German force that is attempting to cut off the Northern units of the French army that had gone into Belgium, etc.

This report will also feature the naming of some of my terrain pieces after the top Patrons of my Patreon Page.  The idea popped into my head the other day, and there are plenty of pieces of terrain that need names!

So, you will see Spark's Peak, McCoy Ridge, the Abassi River, and many more in Sickle Stroke!

To support the making of these reports (each one takes about 18 hours to film, edit, render, etc.), or to have a terrain feature named after you, here is the page:

BTW, I will be doing special patron only videos as well...